CUSTOMER STORY
3DP Experimentation: Quick Development of a Lighter, More Accurate Automotive Inspection Jig

In this blog, you’ll learn how Materialise advisors helped Hyundai Motor Company (HMC) research and develop an inspection jig with impressive improvements, such as a weight reduction of over 50% and lead times that are up to three times faster. Incorporating additive manufacturing (AM) into businesses can be tricky; HMC needed guidance from our experts to achieve these feats.
Step two in the roadmap to AM success: Experiment
Our Three E model outlines the steps and key questions to consider on your road to additive manufacturing success. No matter which industry you come from or what you’re aiming to achieve, you’ll land in the Explore, Experiment, or Enable phase. Based on the phase you are in, we can help you tackle the priority challenges and advance to the next step of your AM goals.


Let’s focus on the second phase of the model: the Experiment, or Applied R&D, stage. This stage is for customers who have concluded the Explore phase and now have clarity on which AM opportunities to pursue and which applications they should develop first. This obviously gives a lot of strategic direction and focus, but does not prove that the ideas and strategy are feasible from a business and technical point of view. Enter the Experiment phase, where we stress-test these ideas and turn them into tangible applications that achieve a broad range of requirements.
Selecting the AM killer application: handheld inspection jigs
Hyundai Motor Company (HMC) was not new to 3D printing. For many years, they had been using 3D printing for rapid prototyping, and their R&D team developed several use cases for the shop floor. For this collaboration with Materialise, HMC had a precise application in mind that they were struggling to make work: a handheld lamp inspection tool for workers on the mass assembly line.
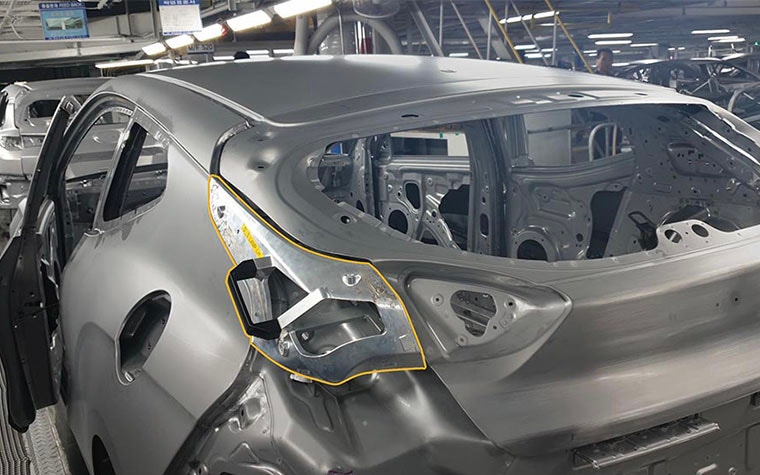
At HMC, each car model has dozens of internal and external lamp assemblies which need to be completely flush with the body of the car. To ensure this, assembly workers need to use handheld tools, called inspection jigs, to inspect the body of the car and measure gaps. These jigs are not only used on the production line but also play an important role in the final phase of pre-production to assess whether design errors have been made on the new car models. These checks can prevent design errors from going into mass production undetected — a very costly issue to correct.

Defining the challenge with HMC: achieving speed, accuracy, and weight reduction
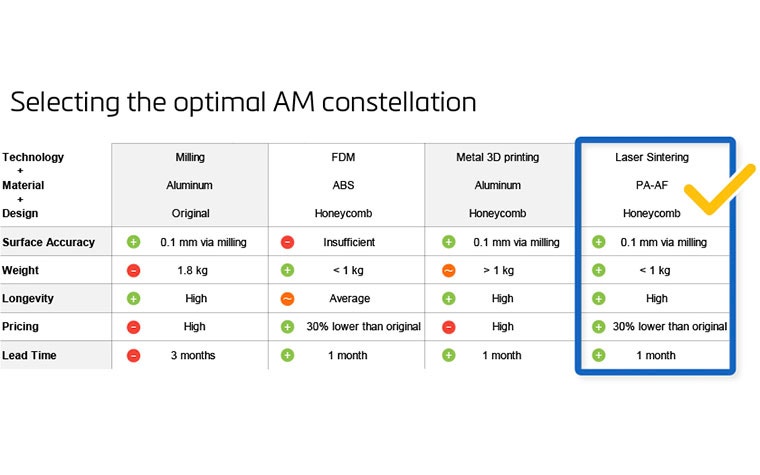
During a first clarity workshop, HMC explained that there were several problems with the conventionally manufactured aluminum jigs that they hoped to solve via 3D printing. The desired improvements included accelerating lead time, improving accuracy, and reducing weight. At the same time, they wanted to maintain lower unit costs and the mechanical strength of the jig.
- Lead time: The three-month lead time for the original jigs exceeded the delivery time of new car models in the pre-production phase. This was especially problematic for the critical jigs, which needed to be used during the final test right before mass production. Not having those on time impeded proper final testing before mass production and caused high risks and sunk costs.
- Accuracy: The accuracy of jigs was 0.15 mm, which needed to be brought down to 0.1 mm for mass-production standards. Otherwise, this could lead to suboptimal inspections, followed by a loss of reputation and brand value for HMC.
- Weight: The current weight of 1.8 kg was too heavy. Workers have to lift this device 100 times at a speed of once per minute. Weight reduction was a key value driver and was crucial for a strong relationship with the labor union.
At the end of this workshop, the objective was clear. HMC and Materialise would jointly create a 3D-printed inspection gauge that offers a 2-in-1 solution for both pre- and mass-production phases because of its high accuracy, lightweight design, and faster lead times. In only a couple of weeks, we developed a proof of concept for the rear outer lamp and tested it directly with HMC workers on the production line.
Making well-informed choices for the optimal AM constellation
Once the acceptance criteria for a specific application are defined, the next step is to identify the optimal combination of 3D design, material, AM technology, and post-processing technique.
The first step was to rethink the current design of the jig. Previously, the jig was a massive component weighing 1.8 kg with lots of dead weight. The goal was to achieve a 30% weight reduction with a lightweight design based on a honeycomb structure. This would minimize the amount of material used while preserving the strength of the part.
With the design concept achieving the weight reduction goal, we then had to assess which material, technology, and finishing combination would best meet the accuracy and strength requirements. Knowing that these parameters can have 5-10 options each often leads to an overwhelming matrix of options which is very daunting to navigate without experience. Our advisors helped Hyundai narrow the options down to three potential combinations.
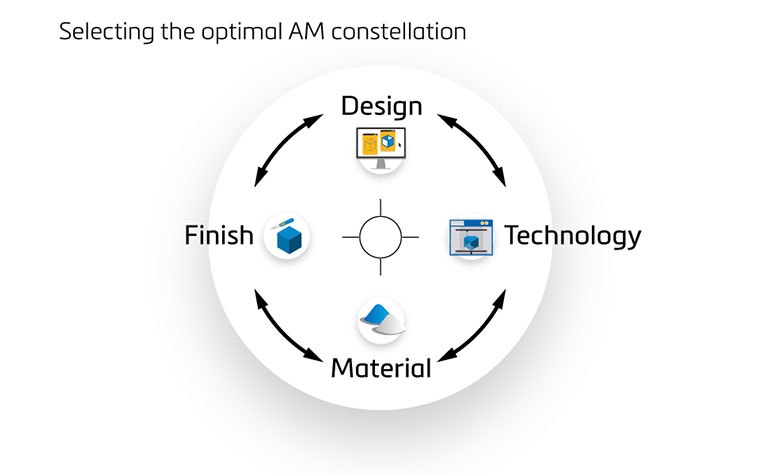

The first option, FDM/ABS, was not viable because the accuracy of parts would not reach 0.1 mm. Additionally, applying post-processing techniques like milling was not possible without damaging the parts. We then considered metal 3D printing. The accuracy could be met by applying post-processing techniques, but this option would be less competitive in weight and pricing. Finally, we landed on the most promising route — a combination of Selective Laser Sintering (SLS) and PA-AF material.
Traditional polyamide (PA) parts printed via SLS would not be accurate enough, and finishing with machining techniques would not be possible. However, by switching from PA to PA-AF, a material that combines aluminum and polyamide particles, these SLS parts could now also be post-processed with milling techniques to reach the desired accuracy of 0.1 mm.
The SLS/PA-AF/milling combination unlocked the solution: a lightweight design, light and cost-competitive material, and post-processing technique that meets stringent accuracy requirements. With the design and the optimal AM constellation defined, we could move to the next step in the Experiment phase: designing, engineering, manufacturing, and testing the part.

A successful proof of concept signifies potential for large-scale jig production
After the two-day on-site workshop, our team returned to Belgium and turned to the expertise and certified manufacturing capabilities of Materialise’s RapidFit subsidiary to design and manufacture the functional prototype.
This experiment highlighted a critical advantage of additive manufacturing: quick lead times. Thanks to its digital nature, we sped up concept iterations and reduced the entire development process from three months to one month. Our engineers could start directly from the lamp’s CAD file and even integrated the locator functionality into the design to reduce assembly operations.
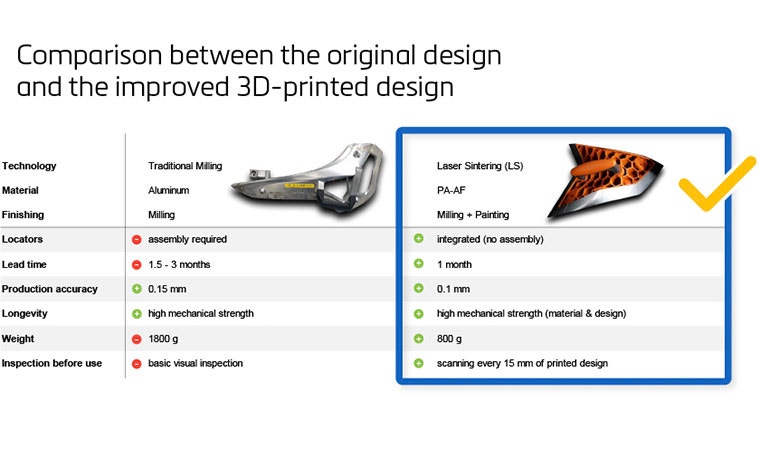

Once the part was printed, we performed a detailed quality check on the part, scanning it in 15 mm intervals — an inspection that was not included in the production of the original aluminum jigs. Three weeks later, the 3D-printed inspection jig was shipped to HMC and successfully tested by their team in the pre- and mass-production environments, impressing production line workers who would work with them daily.
Global car manufacturing leaders like HMC produce dozens of unique new car models every year, requiring not only dozens of unique lamp jigs but also dozens of jigs for the other 20 car parts. Thanks to Materialise helping them crack this case, the potential of 3D printing within their production could yield significant advantages for their business and brand reputation while directly benefitting the health and safety of the workers on the shop floor.
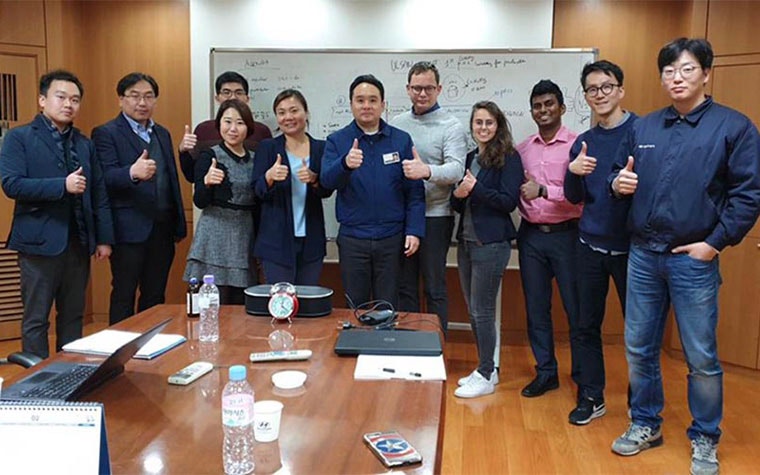

By uniting Materialise advisors’ extensive knowledge of 3DP processes with HMC’s clear application goals, the teams quickly and efficiently determined the most effective way to use automotive 3D printing in this instance. Cases such as this prove why expert guidance during the Experiment phase are crucial for maximizing the technology’s effectiveness and minimizing sunk costs.
Teilen auf:
Das könnte Sie auch interessieren
Verpassen Sie nie wieder eine Story wie diese. Sie erhalten sie einmal im Monat in Ihren Posteingang.
